
PHOTO STYLING TO ATTRACT & ENGAGE YOUR CUSTOMERS... PART 1
Blog
Styling your images to create balanced, emotive and beautiful images of your pieces is one of the most powerful sales tools available to handmade sellers in terms of attracting and engaging with customers. Your imagery should be an extension of your branding and should help tell your brand story.
But sometimes styling your products in a way that enhances and elevates your products and brand rather than overwhelm and detract can be easier said and done.
Do you try and style your jewellery, throw in some props, move stuff about and hope for the best?
You may take literally hundreds of shots to get that 'one' that looks decent enough to use.
In this two part blog series, jewellery photographer, Karen Young shares her styling 'recipe' that takes the guesswork out of nailing photo styling each and every time.

Upping your Photo Styling Game for your Jewellery Photography
And to really up-level your product styling it's not just about props! When I talk about styling the first thing that people ask me is what props they should use. In 95% of cases, people don’t have an issue with their props: they have an issue about where to place those props in the scene to create a visually pleasing image.
So rather than starting with props, when styling your photos I am going to encourage you to think about props LAST!
I use a 5-stage process when styling products to make sure that photographs are on-brand and visually gorgeous. These are:
1. DEFINE THE IMAGE GOALS
2. SELECT THE COMPOSITION TECHNIQUE(S)
3. BUILD THE COMPOSITION
4. PUT IT ALL TOGETHER FOR STYLING SUCCESS
5. SELECT ON-BRAND PROPS AND BACKGROUNDS
Because there is so much to cover on this topic, this is Part 1 of this 2-Part blog series. In Part 1 I cover composition and where to place items in the frame. Because before you think about props, you need to know where to place items in the frame to create a visually pleasing image - otherwise you are going to find yourself spending lots of time moving items about to try and get something that looks good visually.
1. Defining your image goals
When planning your shoot, the first thing you need to understand is the GOAL of your image. Your goal may be:
Close Up Product Shot (more product, less background/ props)
Lifestyle Shots (more of the background/ props)
To evoke an emotion
To convey a mood
To show what the product does/ in use/ being worn
You also need to consider the ASPECT RATIO when shooting as this will impact your composition.
Portrait for Instagram Stories, Pinterest and IGTV
Landscape for Banners, Cover Pages, Hero Images, Blog Images, product listings
Square for Instagram and Facebook, Product Listings, Image cards
This can dictate where you place the items that make up your composition. I typically shoot either portrait or landscape but check images for a square crop before I shoot.
2. Selecting Your Composition Techniques
Composition techniques provide you with a guide or template as to where you place items (backgrounds, props and main focus pieces) in the image.
There are many composition techniques based in science about how the human eye reads images, but a couple of good composition techniques to start with include:
RULE OF THIRDS
LEADING LINES
S CURVE
RULE OF ODDS
These composition techniques really help you decide where to place your jewellery and your props to create a compelling and visually pleasing image.
The Rule of Thirds
This composition technique is usually the first compositional tool you will learn and is a great place to start if new to composition.
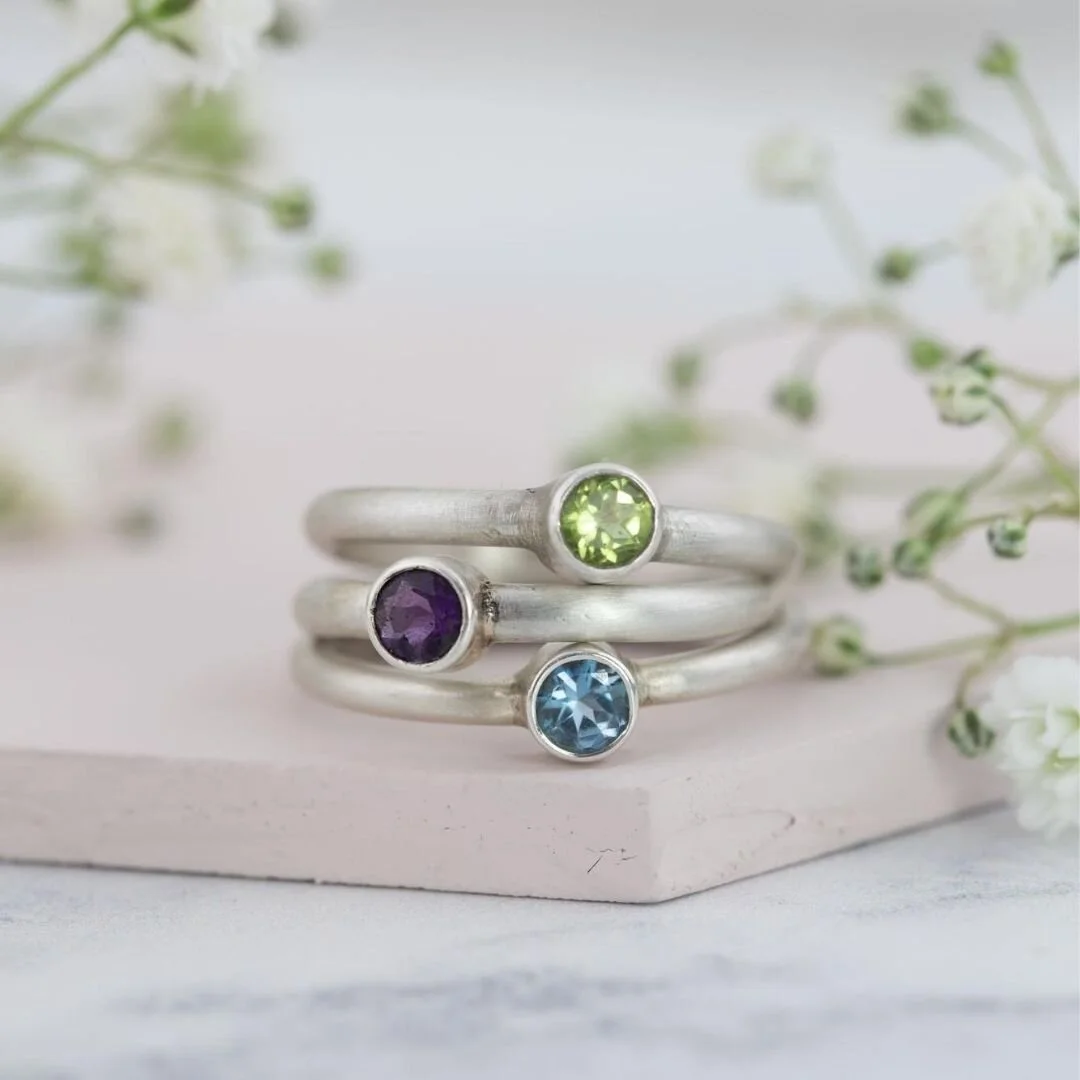
Essentially, the Rule of Thirds places 4 lines in a cross formation that divides the frame into 9 equal areas in a grid format. Handily most DSLR Camera’s and Smartphones offer this grid as an overlay. The eye is naturally drawn to where the lines intersect so you place main item at one of the intersection points or along one of the lines.
In the image below the feature centre of the ring is positioned where two of the lines intersect to create a pleasing image that feels balanced.

Pros of the Rule of Thirds
It’s a treat for close up product shots
It’s Easy to understand and use
It creates balanced, visually pleasing images
Cons of the Rule of Thirds
This technique can be a little boring if not combined with other composition techniques
There are more powerful tools for lifestyle shots and flatlays that will really help you up-level your composition and styling.
Leading Lines
This is a great technique to start ‘leading the viewer’s eye’ through your image using carefully placed lines.
A leading line paves an easy path for the eye to follow through different elements of a photo and adds interest. This technique leads the eye through the frame and past the main point of interest (your gorgeous and works really well with the rule of thirds)!
Here is an example of leading lines in action using the same image from the precious example. See how the rule of thirds and leading lines have been combined?


The effect here is very subtle. But that gentle line leading past the main focus of the image just adds a bit of interest and makes the image feel more rounded.
The S-Curve Technique
This is a fabulous technique for product photography where you place your items in a flowing and elegant S arabesque shape.
The curved lines add interest and movement which is particularly good for softer more romantic brands. This technique leads the eye through the frame and past the main point of interest (your gorgeous jewellery), and is a great technique to try once you have mastered the Rule of Thirds!
Here are some examples of the S-Curve Technique in action:


Pros of the S Curve
It’s a great composition technique for flatlays and lifestyle shots
It adds movement and is more dynamic than rule of thirds and leading lines
It’s a great tool to help organise a shot with lots of items
Cons of the S Curve
It can be a little limiting longer-term if not combined with other techniques.
The Rule of Odds Technique
This is my favourite composition technique for jewellery photography as it has so much potential to grow with you as your skills improve. The rule stipulates using an odd number (1, 3, 5) of objects in a shot, as it’s more visually appealing to have odd numbers over even.
This technique creates balance and harmony to your images - even numbers can lead to matching so nothing stands out and creates confusion. Whereas with odd numbers there is always an item 'in the middle’.
It also encourages having a ‘main’ subject with two supporting elements so you have a ‘middle’.
Here are some examples of the rule of odds in action. Have a think about which one works better and is more visually pleasing….

IMAGE WITH 2 PIECES OF JEWELLERY

IMAGE WITH 3 PIECES OF JEWELLERY
The second image with the three pieces of jewellery seems more complete and is more visually pleasing. It clearly puts the silver pendant front and centre but is supporting with the complimentary yellow gold and rose gold versions of the same pendant.
Pros of the Rule of Odds
This technique is great for all types of jewellery shots (rings, bangles, earrings and pendants)
It provides an easy way to do group shots
It’s a simple rule, yet powerful as it can grow with you into more complex ways and overlay with other composition techniques
Cons of the Rule of Odds
It can take a while to learn what this technique pairs well with.
Layering Composition Techniques
These four composition techniques work really well when combined to create more complex images. How many techniques can you spot in these images?

In the first image we have used Rule of Thirds (look at where the blue stone ring is placed in the frame), Leading Lines (the tile prop creates lines that guide the eye round the image), Rule of Thirds (There are three groups of rings in the frame) and S Curve (look at the position of all the props).
In the second image, we have used Rule of Odds and Leading Lines.
One you have chosen your composition technique(s) for a shot, it makes it much easier to understand where you need to place your jewellery and props in the frame.
Try some of these techniques and next week in Part 2 of this blog series, we are going to dive into styling and how to select the best props and backgrounds for your styling, as well as how to put it all together to great beautifully styled shots for your jewellery business.
And if you want to learn more about jewellery photography, we have a comprehensive online course in jewellery photography that teaches you to take professional quality images of your work from home or your studio. It starts from the very beginning about how to use the camera and covers white background, model and styled photography.

ABOUT KAREN YOUNG
Karen is a handmade jeweller based in London, who handcrafts silver and gemstone jewellery with meaning, heart and soul (and a little bit of sparkle)! Her designs are heavily inspired by texture and form in the natural world.
Karen also recently started offering remote styled product photography for other handmade business owners. Karen passionately believes that all handmade artists deserve sharp, well-lit photos of their beautiful handmade designs to capture the hearts and minds of your ideal customers so they stand out and sell more online.
Karen Young Jewellery
Instagram: https://www.instagram.com/karenyoungjewellery
Karen Young Photography
www.karenyoungphotography.co.uk
hello@karenyoungphotography.co.uk
Instagram: https://www.instagram.com/karenyoungphotographyuk